Ouvvi Apps
Ouvvi Apps, in a nutshell, is a new form of table storage with a modern restful API. Ouvvi Apps was designed to make data integration and reporting on your data simpler and more useful.
Create a New App
If you have never created an Ouvvi App before, you will need to create at least one from Ouvvi before you can create any Apps using the Data Sync quick function.
In Ouvvi
To create an Ouvvi App open Ouvvi, go to Apps and then select New from the toolbar.

Now type in a name and description (if you wish), and then add the columns you want to include. Make sure to select the correct data type for each column from the dropdown list and set any columns that should be unique and can/cannot be null.
Press Save to create the App.

You app is now created and ready to have data synchronised to it.

In Data Sync
Data Sync has a built in function to create a new Ouvvi App based off of your source schema. You will need to have either saved the connection to your Ouvvi Apps in the connection library or you will need to open Data Sync from Ouvvi.
Connecting to Ouvvi Apps in Data Sync
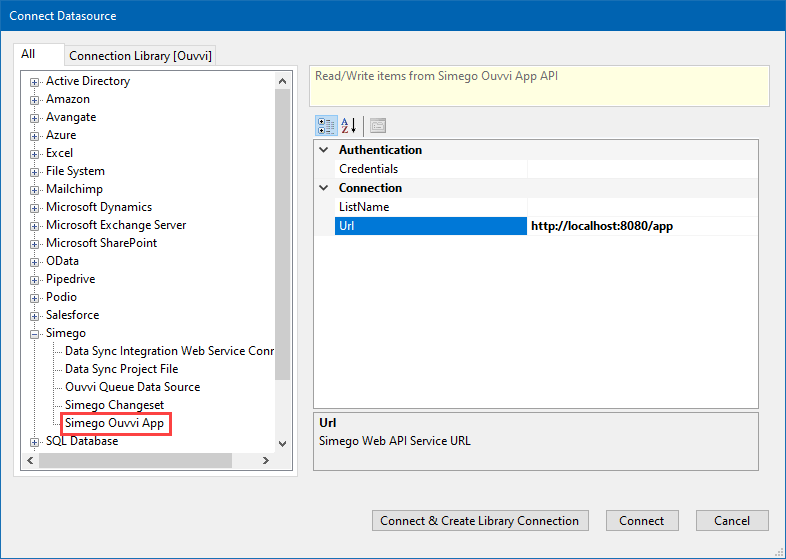
Open the connection window and go to Simego > Simego Ouvvi App.
Enter in the URL to your Ouvvi App API. It should look something like http://localhost:8080/app
Enter in any credentials if the machine you are on does not have permissions in Ouvvi, and then choose your app from the ListName dropdown menu.
Then save the connection by selecting Connect & Create Library Connection.

Using the Quick Function
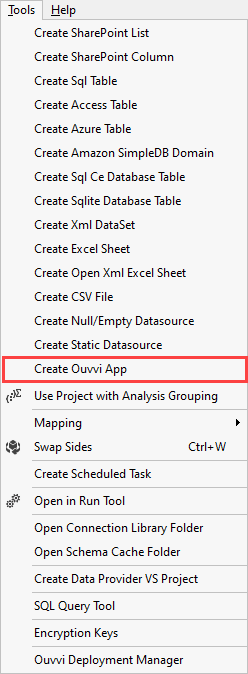
Open Data Sync and load your source data into Data Source A. Add the columns you want to be included in the App to the schema map. Then go to Tools > Create Ouvvi App .

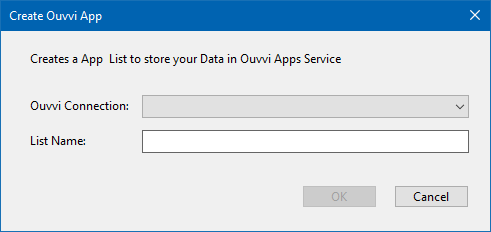
Now choose your connection from the drop down (if you have opened Data Sync from Ouvvi this will be 'Ouvvi Apps') and type in a name for your App.

The app will have now been created, with all the columns in the schema map having been created in the Ouvvi App. You can either run the project in Data Sync to sync the data or you can save the project to run from Ouvvi later.
Edit an App
To edit an App, click on the App and select Edit from the toolbar.

Here you can rename the app, edit the app description and reorder the columns or delete columns. Press Save to save your changes.

Adding a New Column
To add a new column to your App, click on the App and then select Add Column from the toolbar.

Now type in a name for the column, set the data type, set whether it is unique, and whether the column can contain null values.

Delete an App
To delete an App, click onto the App and select Delete from the toolbar.

You will then be shown a confirmation screen, as once the app is deleted you cannot recover it. Click Confirm to proceed with deleting the app.

Export/View the Data
You can export the App data in a variety of formats. To export the data select Export from the toolbar and choose your output format.

You can control what data is returned by using various operators in the URL, some of these are shown in the table below. You can use the URLs generated to feed sorted data into apps like PowerBI.
| Operation | Description | Example |
|---|---|---|
| limit | Limits the number of results returned | http://localhost:8080/apps/xml/myapp?limit=1000 |
| columns | Specify which columns to return | &columns=Column1,Column2 |
| filter | Filter the results logical: "eq", "ne", "gt", "ge", "lt", "le" operators: "and", "or" | filter=Column1 eq sent |
| orderby | Sort the results ascending | &orderby=Column1 |
| orderby | Sort the results descending | &orderby=-Column1 |
| system | Include the system internal columns | &system=true |
| title | Rename the table | &title=My+Table+Name |
CSV
The document endpoints to allow for downloading App data will look something like this:
http://localhost:8080/apps/csv/myapp
Excel
The document endpoints to allow for downloading App data will look something like this:
http://localhost:8080/apps/excel/myapp
XML
The document endpoints to allow for downloading App data will look something like this:
http://localhost:8080/apps/xml/myapp
JSON
The document endpoints to allow for downloading App data will look something like this:
http://localhost:8080/apps/json/myapp
HTML
You can export the data in a HTML format as either a table or a list. Apply any of the operations in the table above to return only the data you need. The document endpoints to allow for downloading App data will look something like these:
Table: http://localhost:8080/apps/html/myapp
List: http://localhost:8080/apps/html/myapp?&pivot=1
API Details
The REST API allows you to work with the data stored in Ouvvi Apps, and supports GET, POST, PUT and DELETE.
To access the details on using the API, select API from the toolbar.

The base URL to use with the Data Sync Simego Web API connector is http://localhost:8080/app.
Authentication
Authentication with the Ouvvi Apps endpoints is either via Windows Integrated Security (NTLM/Kerberos) or Basic Auth using your windows credentials.
If you use Basic Auth ensure that Ouvvi is hosted on a SSL/TLS connection to keep your credentials secure. It is recommended to create a local Windows
APIKeyaccount with minimal permission rather than use your own logon account.
Basic Auth
For Basic Auth take your DOMAIN\Username:Password then base64 encode and add this as a HTTP Authorization Header with the prefix Basic.
Example
PC1\OuvviApiUser with a password of password123 becomes PC1\OuvviApiUser:password123.
Http Header
Authorization: Basic UEMxXE91dnZpQXBpVXNlcjpwYXNzd29yZDEyMw==
Authorization
Read operations require an Ouvvi User account with user permissions. Write operations require an Ouvvi User account with User and Admin permissions.
Documents
The documents endpoints allow for downloading App data in various common document formats.
| Type | URL |
|---|---|
| CSV | http://localhost:8080/apps/csv/myapp |
| XML | http://localhost:8080/apps/xml/myapp |
| JSON | http://localhost:8080/apps/json/myapp |
| HTML | http://localhost:8080/apps/html/myapp |
REST APIs
The REST API allows you to work with the data stored in Ouvvi Apps.
| API | Method | URL |
|---|---|---|
| List Apps | GET | http://localhost:8080/app/list |
| App Schema | GET | http://localhost:8080/app/list/myapp/schema |
| Get Data | GET | http://localhost:8080/app/list/myapp |
| Update Data | PUT, POST, DELETE | http://localhost:8080/app/list/myapp |
The read API returns data in pages of results, therefore to read all data you will need to page through the results. You can specify the page size via the limit parameter.
To request the next page add the page number to the request. For Example: http://localhost:8080/app/list/myapp?limit=5&page=2.
Use Ideas
You can use Ouvvi Apps to export data to use in another system. As a data transformation step, perhaps as a temporary stagin store without needing to create a SQL table on a database server.
You can use Ouvvi Apps to consume data, for example feeding data into PowerBI.

Or how about to send emails and including one of the HTML report views.
