- Add AD Users to SharePoint
- Export SharePoint Lists to SQL Tables
- Import Documents to SQL Table
- Setting Content Types
- Bulk Upload Documents
- Multi-Value/Lookup Columns
- Import Emails to Lists
- Import Files to Document Library
- Import SQL to SharePoint
- Two Way Synchronisation
- List Data replication
- Sync Folders with the File System
- Sync Documents and Metadata
Setting SharePoint Content Types
When trying to update SharePoint Document Libraries or SharePoint lists on a regular basis it is useful to be able to set specific metadata.
One type of metadata that you might be interested in setting is Content Types. Content types allow you to set templates, retention policies and define a group of columns for that type.
The following page will show you how you can set the Content Types on SharePoint list items and Document Library items using Data Synchronisation Studio.
Requirements
Before getting started you need to ensure you have the following:
- Windows 10 or Windows Server
- Downloaded & Installed Data Synchronisation Studio
- Access to SharePoint Online
- Configured your connection to SharePoint Online in Data Sync
Getting Started
To set the content types for an item you need to return the content-type id value from SharePoint.
If you do not know the ID value that SharePoint is expecting we recommend setting content types for a couple of items manually and then preview the results returned from SharePoint in Data Sync. You can then make a note of each ID and update your source data accordingly.
Some common ID types are:
- Item:
0x0100860DBE824AC9614589A21DCD29DB5448007A823F8834051D4F986EA19A5812FF09 - Issue:
0x01030066DC9B12B8DE924CBD18288FA706EA1C - Message:
0x010700B796C8AF0D82994A86E8DAF1B01A3FFB - Task:
0x0108004931F959CF5D224F8A156604BB7B6005
You have a couple of options when updating the source data:
- Manually update the source data with the correct ID
- Use calculated columns to replace the text value with the ID that matches
- Create a list with the types and IDs and lookup the ID
The manual process is self explanatory, but you can find descriptions on how you might configure the other options below.
You need to start by configuring your Data Sync project so that you are connected to your source data and the target is connected to your SharePoint list you want to update. Then you can choose between creating a calculated column or creating a lookup.
Calculated Columns
You can use calculated columns and a CASE function to return the relevant ID when the content type name in the source data matches the case in the function.
The expression below returns the ID for message, item, issue, and task and if the source column contains something that doesn't exist in the expression it will return a default value of the issue ID.
CASE(ContentTypeName, "0x0100860DBE824AC9614589A21DCD29DB5448007A823F8834051D4F986EA19A5812FF09",
KV("Message", "0x010700B796C8AF0D82994A86E8DAF1B01A3FFB"),
KV("Item", "0x0100860DBE824AC9614589A21DCD29DB5448007A823F8834051D4F986EA19A5812FF09"),
KV("Task", "0x0108004931F959CF5D224F8A156604BB7B6005"),
KV("Issue", "0x01030066DC9B12B8DE924CBD18288FA706EA1C"))
The syntax for this is:
CASE(ColumnName, DefaultValue, KV(Value, ValueReturned), KV(Value2, ValueReturned2), KV(Value3, ValueReturned3))
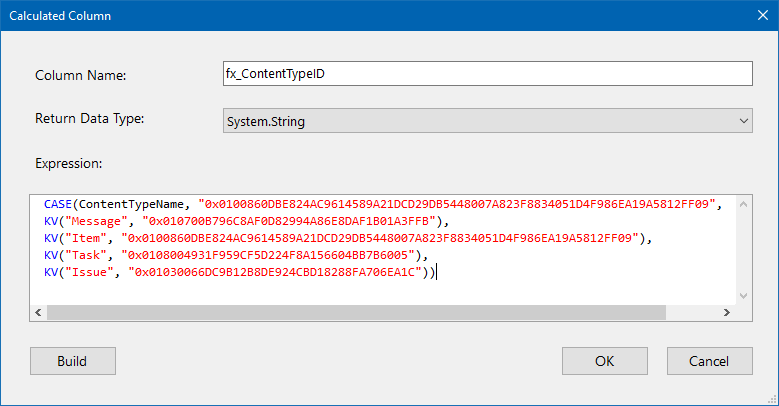
Clicking OK will create the column in your source window and you can then add this column to the schema map and map this to the Content Type ID column in SharePoint

Lookup to a Custom List
If you have a list of content types you want to use within your list or library then you could store these and their corresponding ID's in another list or datasource and perform a lookup on each type.
Please be aware that if there is a type that does not exist in the list you create and therefore has no ID being returned SharePoint will default the type to Item.
Here I have created a SharePoint list to hold the content type names and their corresponding IDs and I will lookup the type name I have listed in my source data against this list to return the relevant ID. This list has been named ContentTypes.
To create the lookup just drag and drop the ContentType list onto the column in the source data that contains the name of the content type, in this example it is ContentTypeName.
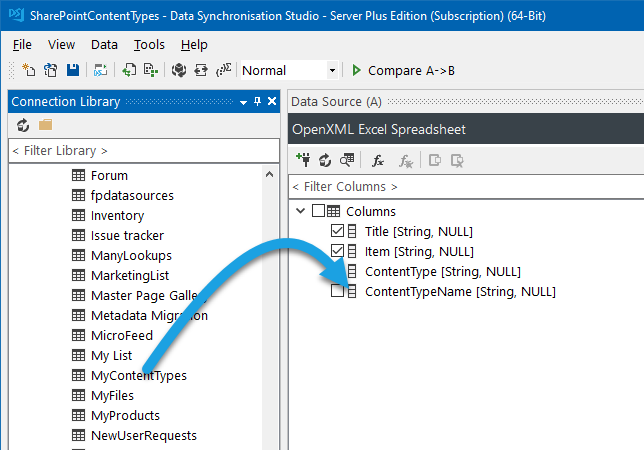
This will then open the lookup configuration window where you can define that it is the content type that is being looked up. This should look similar to the below:
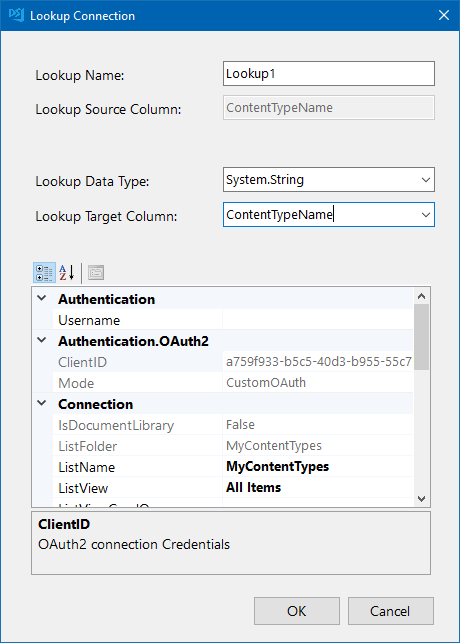
Click OK to create the lookup and now you can access all of the columns within the ContentTypes list. I'm adding the Content Type ID to the schema map by expanding the lookup columns and checking the checkbox.
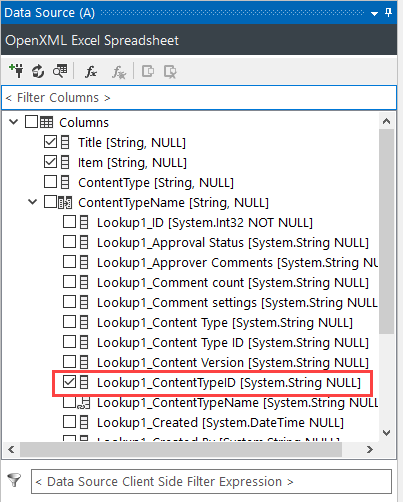
You can then map this column to the Content Type ID in your SharePoint list, and add any additional columns you need. Please make sure to select a key column that can be used to identify each record, in this case it is Title.

To show you that the lookup is working I have added in the column from the source that returns the content type name and previewed the data to show the different IDs that are returned.
Make sure you remove the Content Type Name column before synchronising as this will throw an "Invalid Request Error" if you try to synchronise to it.

Preview & Sync
We can then preview the changes to be made to add these to SharePoint by clicking Compare A > B.
This will show us any add, update or delete actions that need to be performed to make the SharePoint list match the source data.
Please note that deletes are disabled by default but will still show in the results if the record does not exist in the source data set.
To enable deletes please set EnableDelete to True in the target connection properties.
There are 6 records to add and we can now synchronise the results by clicking Synchronise and then Start.
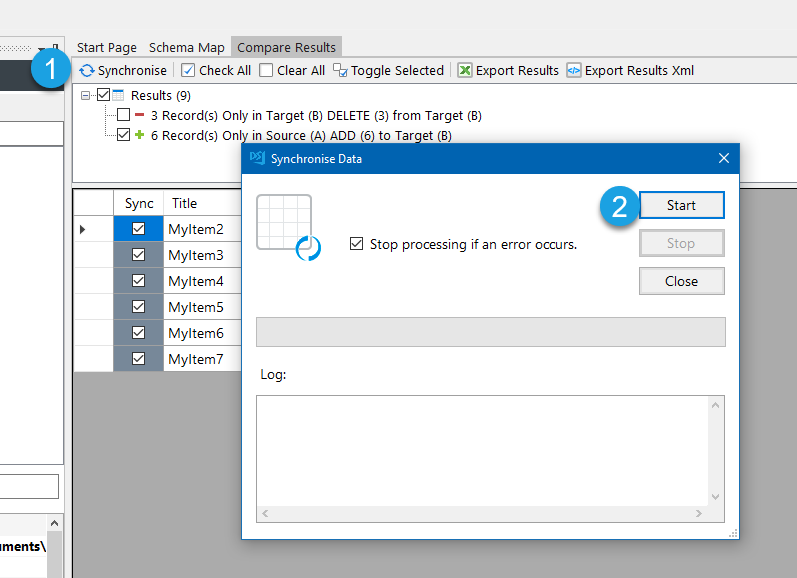
The records will then be added and updated in SharePoint with the corresponding content type.
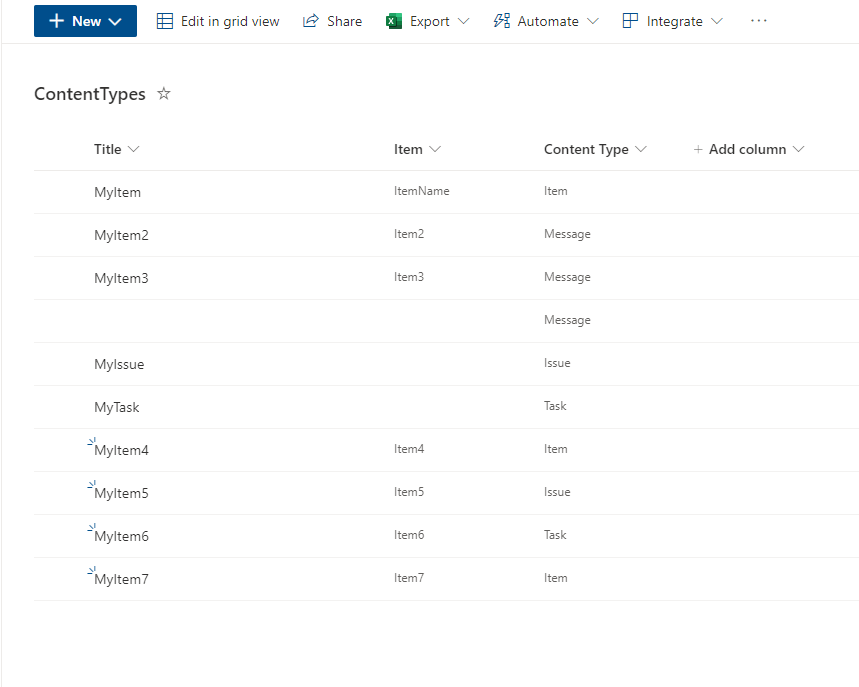
You can now save the project to be used again in the future or you can schedule it to run on a regular basis using either Ouvvi or the Run Tool.
For other ideas on how you can integrate with SharePoint take a look at our SharePoint Solutions page.
