Setup
This Setup guide is for a basic new Ouvvi Instance on a Single Server using Windows Integrated Security and mostly default settings.
System Requirements
- .NET Framework v4.6.2
- Windows Server 2012 or Higher
- IIS 7.5+
- Microsoft SQL Server LocalDB, Express, Standard, Web, Enterprise 2014+
- 2 GB RAM
- 1 CPU Core
- 50 GB Disk Space
Install Data Synchronisation Studio
Install the latest version of Data Sync from the Simego website https://www.simego.com/install/data-synchronisation-studio
Ouvvi v3 applies to versions of Data Synchronisation Studio v3.0.1080 and higher.
Install IIS Components
The default IIS configuration can be installed via PowerShell, either run the PowerShell script that is installed with Data Sync or run the script directly below to install the IIS pre-requisite components.
The PowerShell IIS Install script can be found in the following path %ProgramFiles%\Simego\Data Synchronisation Studio 3.0\PowerShell\IIs-Setup.ps1
#Install .NET Framework 4.6
Add-WindowsFeature NET-Framework-45-ASPNET

$features = ("IIS-WebServerRole", "IIS-WebServer", "IIS-CommonHttpFeatures", "IIS-HttpErrors", "IIS-ApplicationDevelopment", "IIS-NetFxExtensibility45", "IIS-WindowsAuthentication", "IIS-ISAPIExtensions", "IIS-ISAPIFilter", "IIS-ASPNET45", "Windows-Identity-Foundation")

# Enable IIS Features
Enable-WindowsOptionalFeature -Online -FeatureName $features
Install SQL Server Database Engine
Ouvvi can run on all editions of Microsoft SQL Server from LocalDB through to Enterprise Edition.
LocalDB is the simplest low footprint version suitable for small deployments managing a small number of projects.
Download SQL Server Express and LocalDB from https://www.microsoft.com/en-us/sql-server/sql-server-editions-express
To Install LocalDB run the above installer for SQL Server Express and choose Download Media and select LocalDB. Then run SqlLocalDB.msi
The SQL Server can be on a different machine to Ouvvi there is no requirement for SQL Server to be running on the Ouvvi Server. (except for LocalDB option)
Install Ouvvi Instance
To install a new Instance of Ouvvi requires IIS WebSite, Windows Service and SQL Database to be configured.
Run the PowserShell Script below to install a new Instance of Ouvvi. The settings below are the defaults and you may want to change them for your system.
#Import Ouvvi PowerShell Module
Import-Module OuvviAdministration

#Install Ouvvi Instance
Install-Ouvvi -targetPath C:\OuvviTenants\Default -iisAppName OuvviDefault -iisAppPoolName OuvviDefault -iisPortNumber 8080 -instanceName Default
SQL Database Configuration
For LocalDB you do not need to make any changes to continue with the setup.
For SQL Express, Standard, Azure etc. you will need to create a new Empty SQL Database on your Database Server and update the connection string in the <TENANTPATH>\Web\Web.config file to match.
Note: Integrated Security is preferred here so you will need to set the Ouvvi Web AppPool to a Windows Account that has permmission to connect with the database you created.
Ouvvi requires Database Admin permission to create the Tables and setup the Database so grant the user account DBO rights on the new database. After setup is complete you can relax these permissions to db_datareader and db_datawriter roles.

Ouvvi DB Setup
Open your web browser to the Ouvvi Setup URL http://localhost:8080/setup to complete the Database Setup.
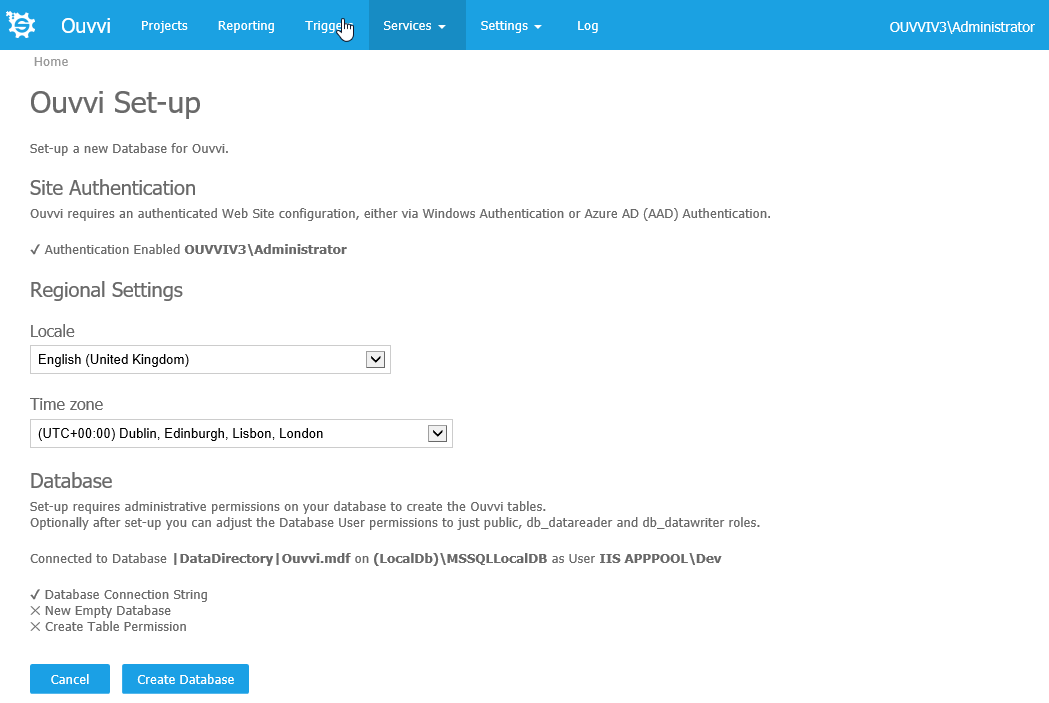
Verify the Setup configuration, select your Regional Settings and Time zone and then press Create Database for LocalDB or Setup for SQL Server.
Ouvvi Service Setup
Verify the Ouvvi URL is correct for the Windows Service open the configuration file <TENANTPATH>\Service\Simego.Console.Service.exe.config in a text editor and update the OuvviServiceUrl value if necessary. (default value is http://localhost:8080)
Next the Ouvvi Windows Service should be configured to run under a network domain account and started (this account will be used as the security context to run the steps) to do this open the services control panel (services.msc) and configure the Ouvvi Processing Service for your tenant and set the Startup type to Automatic (Delayed Start).
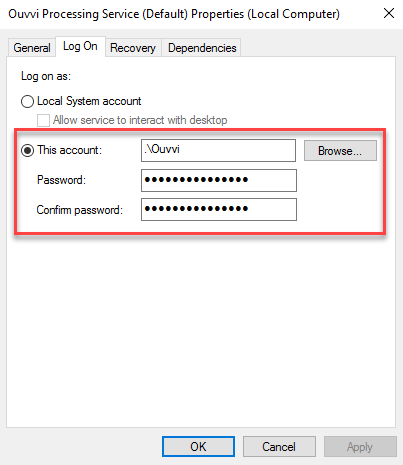
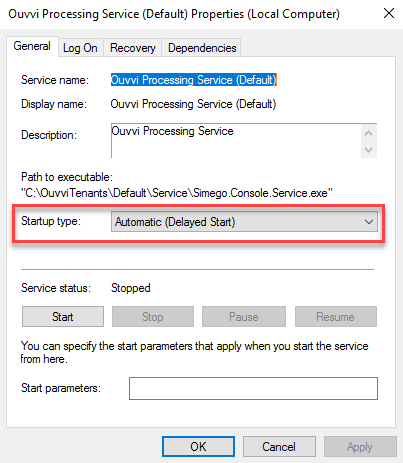
The Ouvvi Service can run under NETWORK SERVICE if you only need to connect to internet and local machine resources.
Services Running
Verify that your services are all running under Services->System Services green flags indicate that the service is running OK.
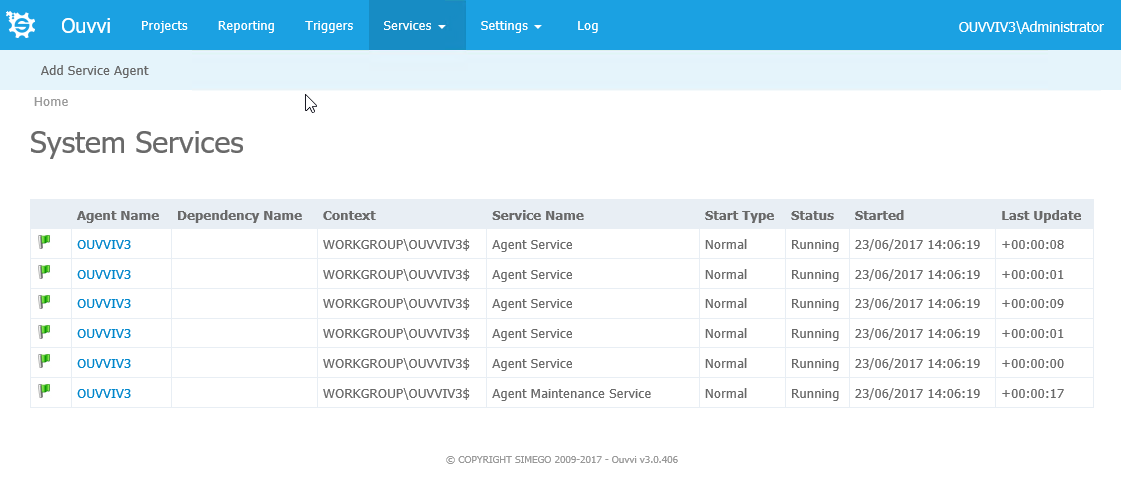
By default the service are configured to start on the local machine you can add new Service Agents here and define the machines that they should run on.
Ouvvi License Key
Ouvvi uses the same Data Synchronisation Studio Server license key as Data Sync.
To install go to Settings -> Register License, as shown below:
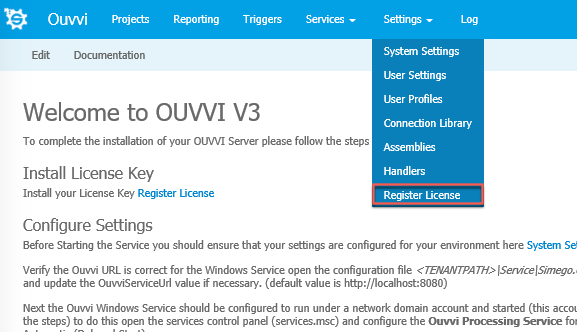
Then enter your license key into the box and click Activate.

Ouvvi will not run any projects and steps without a valid license key installed.
If you do not have an internet connection and need to activate your key, please see our page on Manual License Key Activation.
