Creating Activity Records
To create activities such as phonecalls, appointments, tasks and emails in Dynamics you need to provide the GUID of the item you are adding and sync this to the corresponding entity. For example tasks will need to be synced to the Task entity, phone calls to the Phonecall entity, appointments to the Appointment entity and so on.
Below we will cover a few of the considerations for each activity type and how you might map the columns
Requirements
Before getting started you need to ensure you have the following:
- Windows 10 or Windows Server
- Downloaded & Installed Data Synchronisation Studio
- Access to Dynamics 365
- Configured your connection to Dynamics 365 in Data Sync
Considerations
If you are regularly updating activity records in Dynamics then we would recommend containing all of your projects within an Ouvvi project. This will enable you to run each project on a schedule and run them in sequence. You can additionally add a step to notify you that the project has completed and the details of what changed.
You can find more details on the project status report step in our documentation. Alternatively you could also use the Run Tool to schedule your projects.
If your source data is a selection of different activity types then you can filter the source records to only return the activity type you are trying to update.
For example you could filter the source with the expression activitytype == "phonecall" to filter the results to return only phonecalls.
The below examples assume you have already connected to Dynamics and saved the connection to the connection library, and that you have your source connected to your source data.
Adding Phonecall Activities
To write phone call activities you must connect the target to the Phonecall entity and provide the data in the format Entity Name| GUID of the Item. We recommend adding a record manually so then you can preview the format that Dynamics is expecting.
For phone call activities you need to supply the following fields at a minimum:
- from - The user that made the call in the format
systemuser|systemuserid - to - The account or contact that the call relates to in the format
account|accountidorcontact|contactid - subject - The subject of the call
- activityid - A guid to uniquely identify each activity
You can then additionally add in other metadata such as a description, duration, date, ownerid, ownertype etc.as you need.
A sample of the data we are returning for this can be seen below:

You will need to lookup the account name in your Dynamics site to return the account id so that we can present the to field in the format expected in a few moments.
If your data is linking to a contact record rather than account then you can follow the same details as below but lookup the contactid in the Contact entity and return the id in the format contact|contactidGUID e.g. contact|14daefde-d3d1-ec11-a7b5-00224880a494.
Drag and drop the account entity onto the source column that contains the account name, e.g. Account.
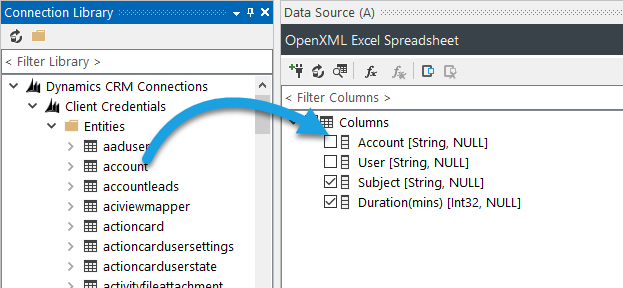
This will open the lookup configuration window where you will need to specify the column within the account entity to lookup the source values. In this case name. Click OK to save this and create the lookup.
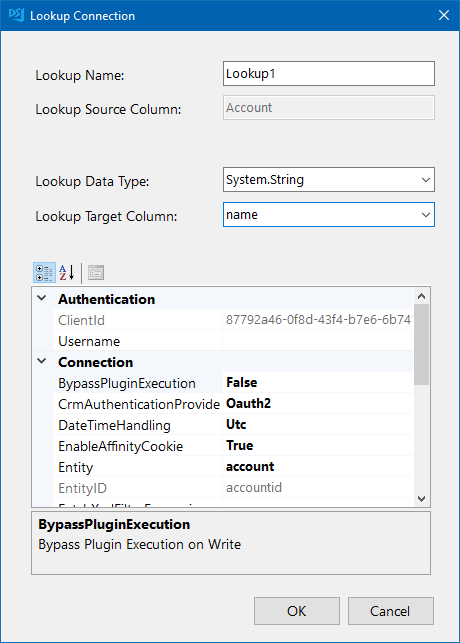
Now repeat this for the system user entity to lookup the user by fullname.
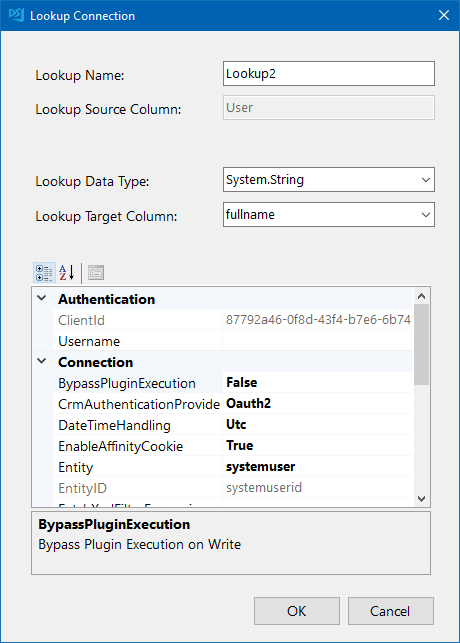
We can now use calculated columns to return the entity name and GUID in the format we mentioned earlier.
To do this click onto the fx button in the datasource toolbar, enter in name for the column and make sure the data type is set appropriately.
CONCAT("account|", STR(Lookup1_accountid))
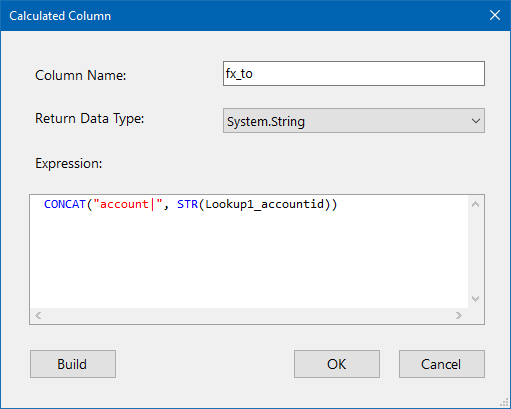
Alternatively you can do the lookup in the function rather than creating it separately:
CONCAT("account|", STR(LOOKUPB("accountid", "account",WHEN("name", Account))))
You need to do this for both the to and from fields.
Once they have been created we can then map these columns to the schema map and link them to their corresponding field in Dynamics. You can now add any additional columns you might need and make sure to set a unique key column that can be used to identify each phone call activity.

To run the sync click Compare A > B to view the changes that need to be made, and check the preview to ensure the data looks as you expect. Here we have 5 phonecalls to add, note that deletes show in the results but are disabled by default. To enable them please set EnableDeletes to True in the target connection properties.
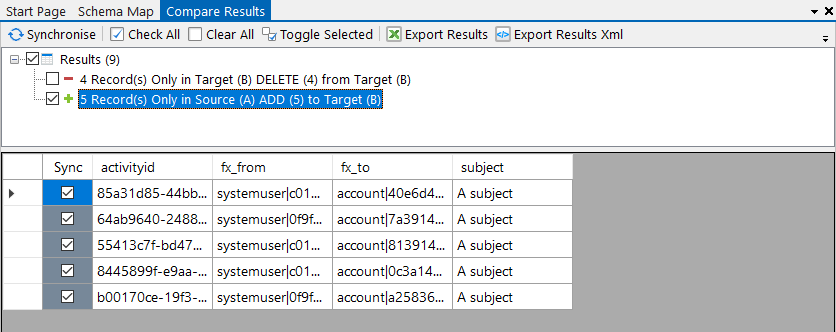
Once you are ready click Synchronise and Start to begin the sync.
You can now save you project and move on to creating the projects to sync other activities.
Adding Appointment Activities
Adding appointments as activities to your Dynamics site is very similar to adding phonecalls, the main difference being you connect to the appointment entity as your target and there are different required fields.
At a minimum the columns you need are:
- activityid - A guid to uniquely identify the activity.
- organiser - The user the appointment is with in the format
systemuser|systemuserid - requiredattendiees - The contact or account that the appointment is with in the format
contact|contactidoraccount|accountid - scheduledstart
- scheduledend
If you want to change the status of the appointment you can do so by adding statecode: 1 is completed, 2 is cancelled and 3 is scheduled.
A preview of the data we are using for this example can be seen below:
We need to lookup the contactid and the systemuserid and then format the values.
First start with the lookups. Drag and drop the contact entity onto the contact column in the source, and then configure the lookup to target the contact full name as this is the data we have in the source file.
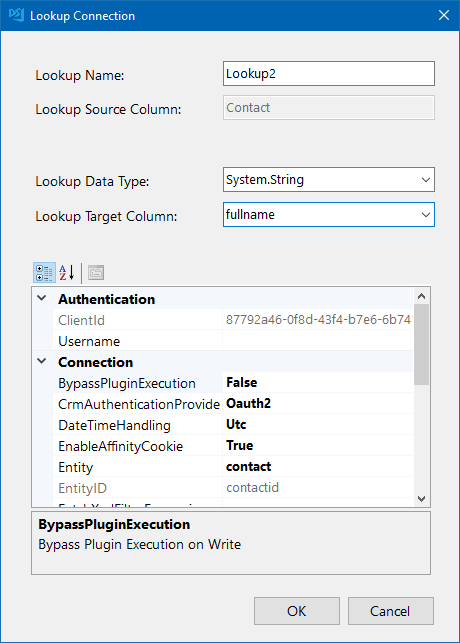
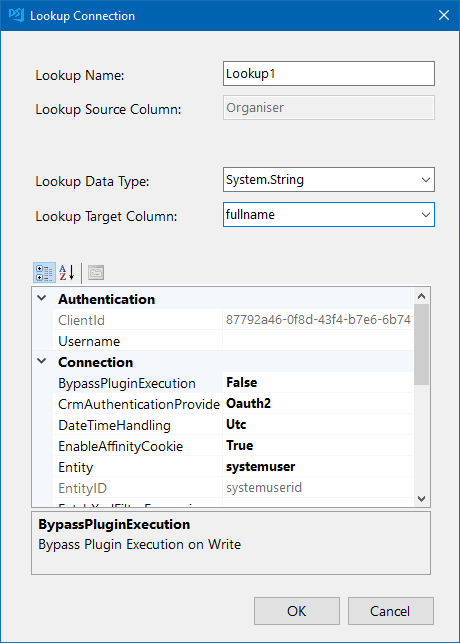
We can then repeat this for system user. Drag and drop the systemuser entity onto the organiser column and then configure the lookup to target the full name of the user.
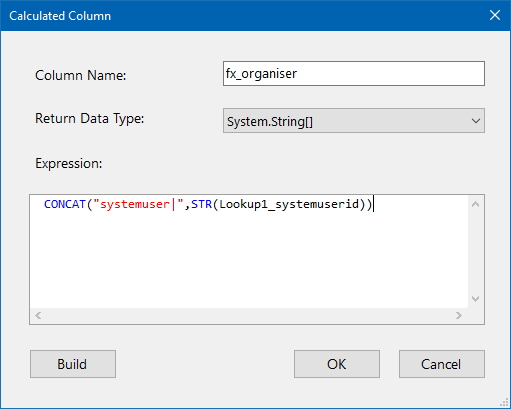
Now we can create the calculated columns to format the values. Lets start with the organiser. Create a calculated column and use the following expression to concatenate systemuser| with the systemuserid.
For the contact, create a calculated column and use the following expression to concatenate contact| with the contactid.
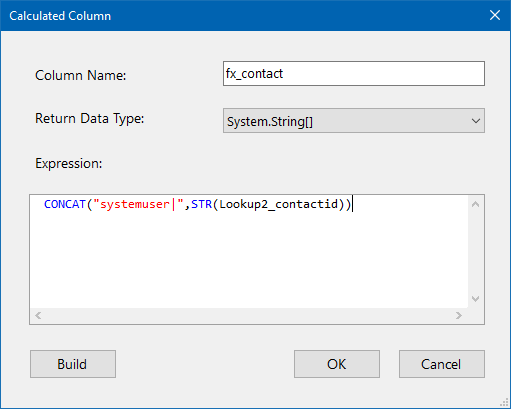
You can now add these new column to the schema map alongside the other required fields and any other fields you want to include. Your schema mapping should now look similar to this:

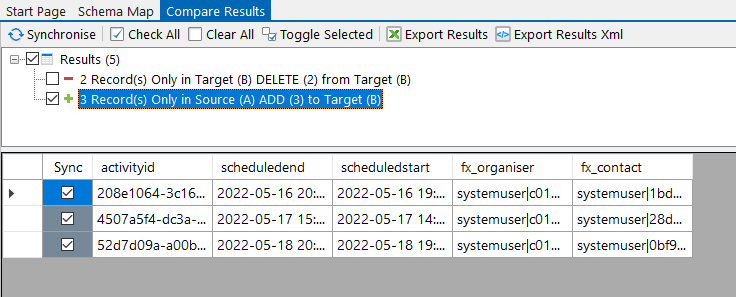
To finish simply compare, preview & check the results, and then synchronise the changes to import your appointment activities.
Adding Email Activities
To synchronise emails as activities in Dynamics you need to connect your target to the email entity and include a few more required columns. The example below uses a document to contain the message details rather than connecting the source to exchange.
The columns you need to include are:
- activityid - A guid to identify each activity as unique
- from - The system user who sent the email in the format
systemuser|systemuserid - to - The contact that the email is being sent to in the format
contact|contactid - subject - The email subject
- description - The body of the email in either HTML or plain text
- regardingobjecttype - The type of object the email relates to in this case a "contact"
- regardingobjectid - The ID of the contact it relates to
By default the email will be set to draft status, however if you want to define this then you can do so by setting the statuscode: 1 is draft and 3 is sent.
Below is a preview of the data we are using in this example.

We need to start by looking up the contact id and the sender id and then format this into the format object|objectid.
To add the lookup to contact drag the contact entity from the connection library onto the contact column in the source.
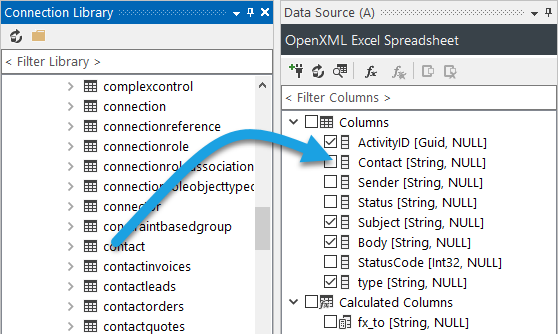
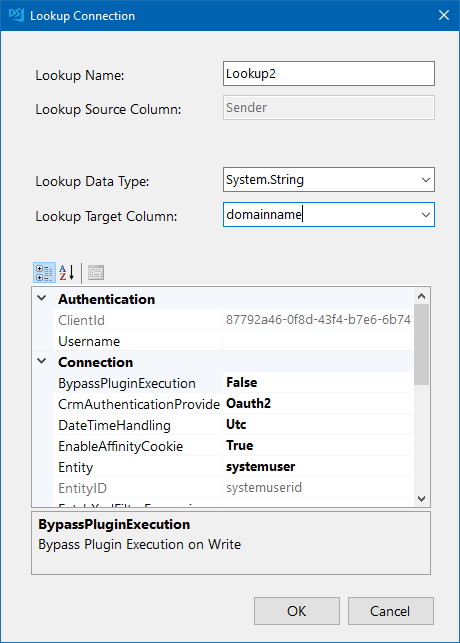
Then configure the lookup so that the value is being looked up in the correct column. In this example as we have the full name we join the lookup on fullname.
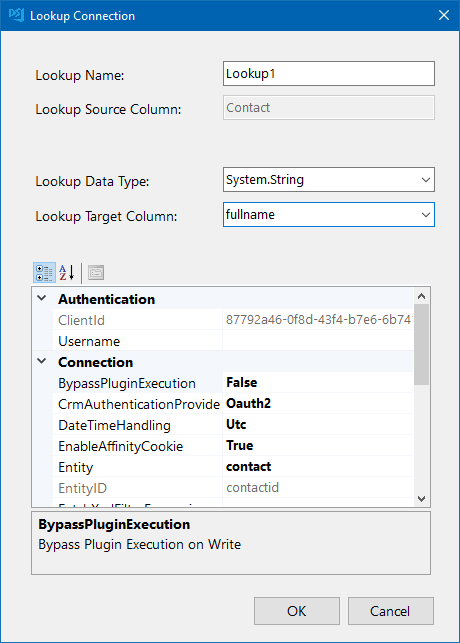
To add the lookup to the system user drag the systemuser entity from the connection library onto the sender column in the source.
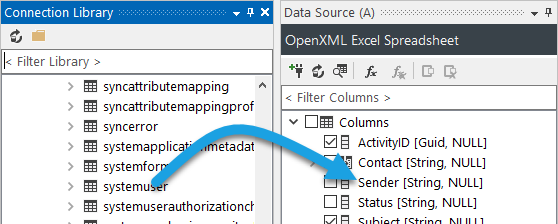
Then configure the lookup so that the value is being looked up in the correct column. In this example as we have the email of the sender we join the lookup on domainname.
We now need to use the lookups to format the to and from columns. This can be done using calculated columns and the functions described below.
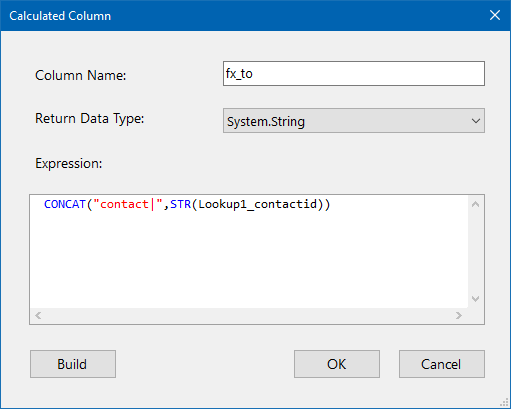
To format the to column we can use calculated columns with the expression:
CONCAT("contact|",STR(Lookup1_contactid))
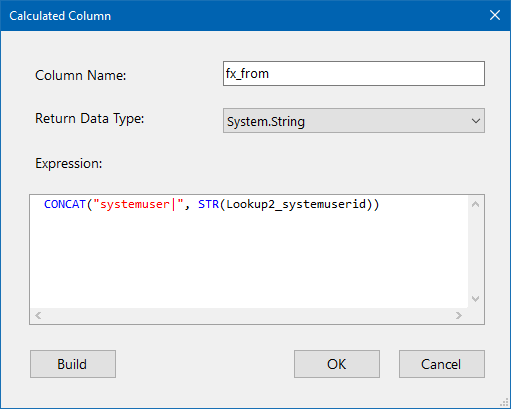
To format the from column we can use calculated columns with the expression:
CONCAT("systemuser|", STR(Lookup2_systemuserid))
These can now be added to the schema map and linked to their corresponding column in Dynamics. Your schema map should look something similar to below with a key column selected.
You can get the contactid to map to the regardingobjectid column from the lookup. Just expand the lookup columns and select the Lookup1_contactid column.
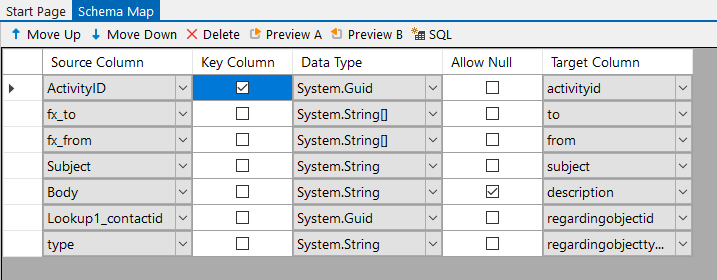
If you need to add multiple recipients you can do so by supplying them separated by semi colon e.g.
contact|77962dc3-fcd5-ec11-a7b5-000d3abdf148;contact|969924e0-7c2c-4e85-be9d-000d3abdf148
You can now compare and sync as normal to import your email activities.

Don't forget to save your project so that you can use it again at a later date. If you upload it into Ouvvi or the Run Tool it can be scheduled to run on a regular basis.
If you have any questions please send us an email at support@simego.com.
