Create New AD Users
If you have a series of users to provision in your Active Directory then you can make the process simple and automated using Data Sync and Ouvvi.
The following page will cover how to configure a Data Sync project to create Active Directory user accounts, set the manager, assign the users to groups and set a default password in the same project. We then cover a few options you have in order to automate the project so that it can be run automatically.
You can create Active Directory users from any data source, for example a CSV, Excel Spreadsheet, SQL Table or a SharePoint list to list a few.

Requirements
Before getting started you need to ensure you have the following:
- Windows 10 or Windows Server
- Downloaded & Installed Data Synchronisation Studio
- A data set with your user details listed
- Access to Active Directory
Connect to your Source
First you need to prepare your source data to make sure you have all the data you want to add. You want your source data to look like you want your Active Directory to be.
If you want to add a manager you need to ensure you have either a manager email, employee ID, distinguished name, or sAMAccountName listed against your users. In this example we have the manager email address.
If you want to add the users to groups then you need to ensure the groups are listed with a semi colon separating them. The dataset shown below has users added to three different groups and these are listed as: Group A;Group B;Group C
A preview of the dataset being used in this example can be seen below:

Once you have your data together connect to this as your source in the Data Sync Project by clicking into the data source A window. In this example our data is stored in a SQL Table, but you can use any of the built in providers to connect to your source data.
Connect to Active Directory
You now need to connect the target data source to your Active Directory OU. To do this click onto Connect Datasource in the target window and go to Active Directory > Active Directory V2 - Users/Contacts/Groups/Computers.
By default Users will be selected from the DefaultAttributes drop-down menu, this is what you need so you don't need to change this. Then enter in the LDAP path to your Active Directory instance, and enter in any credentials you need to access AD.
You can enter in the full LDAP path (including the server name) or just the server name.
If you just use the server name your path would look similar to: LDAP://dc01.
Otherwise an example path connecting to a specific OU could be: LDAP://dc01/OU=Test,DC=demo,DC=simego,DC=com.
We have more details on finding the LDAP Path in our documentation.
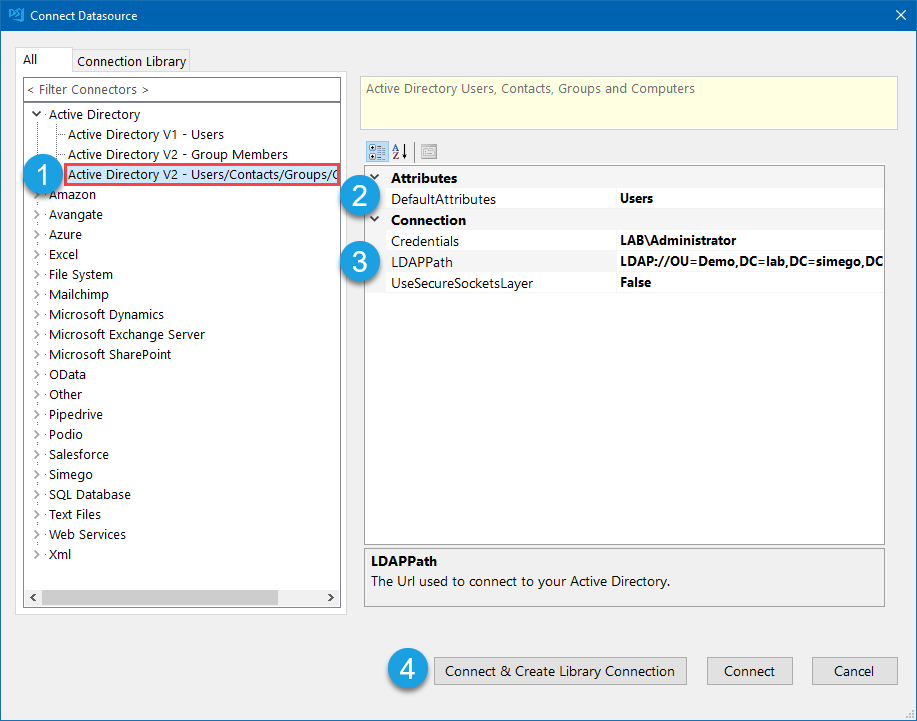
Then click Connect & Create Library Connection to save the connection to the connection library. Just enter in a name for the connection and click OK. Then refresh the connection window and your Active Directory connection will be visible in the list.
This only needs to be done once per OU as you will be able to access other objects such as Groups and Contacts from the connection window.
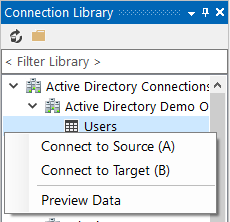
If you have already saved your connection to AD you can select the Users object from your AD connection.
Map the Source & Target Columns
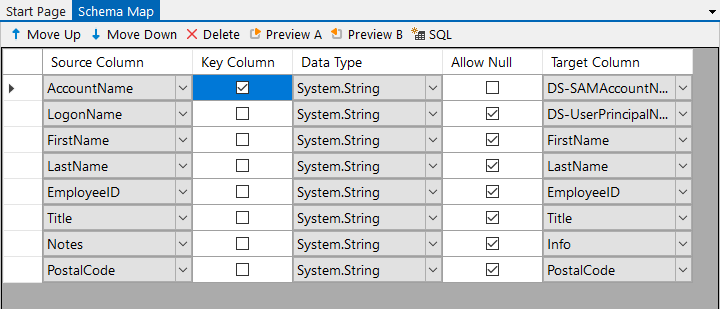
The next step is to configure the schema map so that your source columns are linked to the correct attribute in Active Directory.
You need to specify a key column to identify each user as unique.
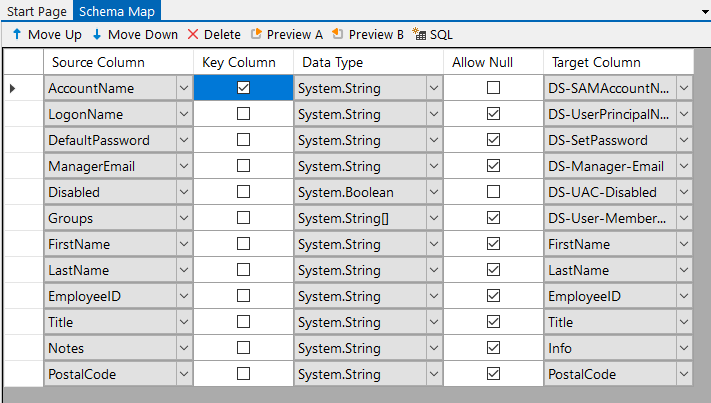
We find that the AccountName is a good field for this so map this to the DS-SAMAccountName column another alternative is LogonName (DS-UserPrincipalName).
DS-columns are Data Sync attribute columns that handle the addition of that field for each user. These usually have to be handled differently to add the values, which in previous versions would have needed you to write code. These columns take away the need to add code to project automation.
Your basic schema map might look similar to the screen capture below:
You can then follow each of the sections below to add the manager details, set a password, enable the user account and add the user to groups.
Set the Default Password
To set a password you need to map the password column from your source to the DS-SetPassword column in the target.
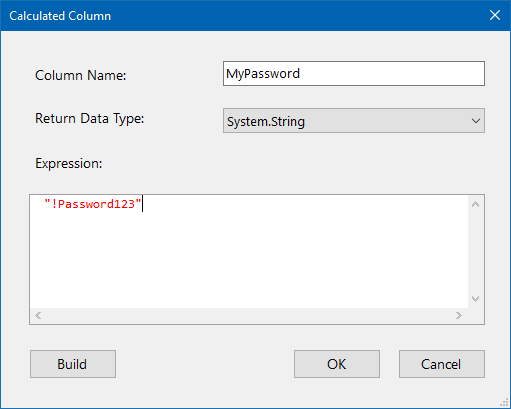
If you don't have a password listed in your source data you can supply a password, such as !Password123, to be used to all new accounts using calculated columns.
To do this click onto the fx button in the data source A toolbar to open the calculated column window.

Your calculated column should then be configured to look similar to:
Add your column to the schema map and match this to the DS-SetPassword column in the target.
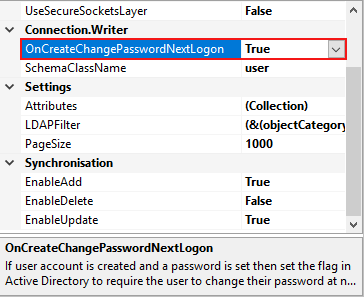
To make the user have to change the password at their next logon, as the default is not secure, we need to set pwdlastset in the target connection properties with the OnCreateChangePasswordNextLogon property. By default this is set to true, however if you do not want users to change the password then set this to false.
So then the password does not cause an update action each time the project runs (on existing user accounts) you need to change the schema property Ignore for the Password column to True.
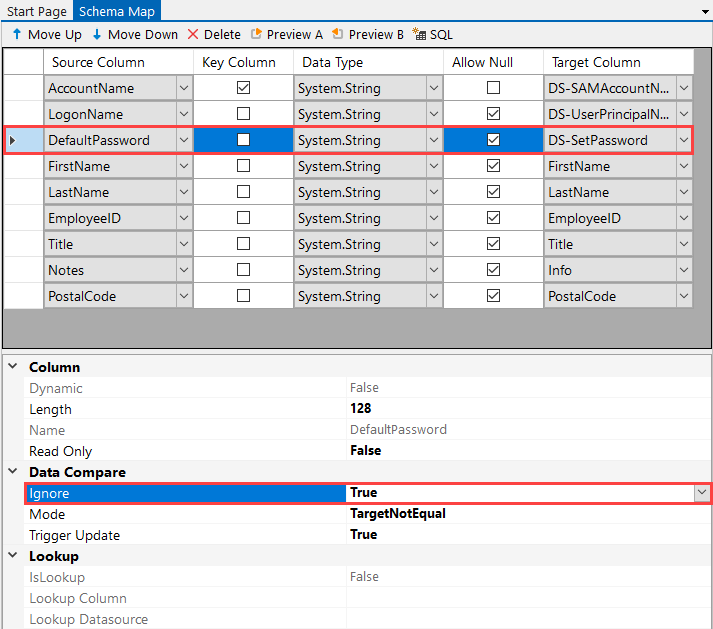
NB. The password can only be set on new user accounts
Set the Manager Attribute
To set the manager attribute you just need to map one of the following columns to it's corresponding data sync column.
- Distinguished Name -> DS-Manager-DN
- EmployeeID -> DS-Manager-EmployeeID
- Email -> DS-Manager-Email
- sAMAccountName -> DS-Manager-SAMAccountName
In this example the manager is listed by the Email Address, so for this we would use the target column DS-Manager-Email.
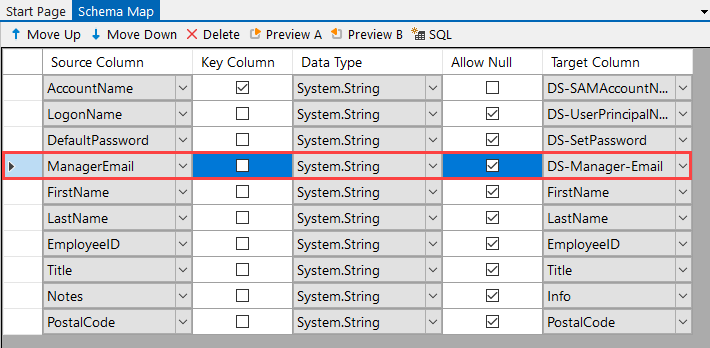
Please note that if the manager does not exist in Active Directory it will return null for the manager field. For example a new manager may be in the list of users you are adding. If you have this scenario then you will need to run the project again to update the manager column. Make sure to set EnableUpdate to True if it is not already.
For a more detailed description on updating the manager attribute for existing users please see our other guide here.
Enable User Accounts
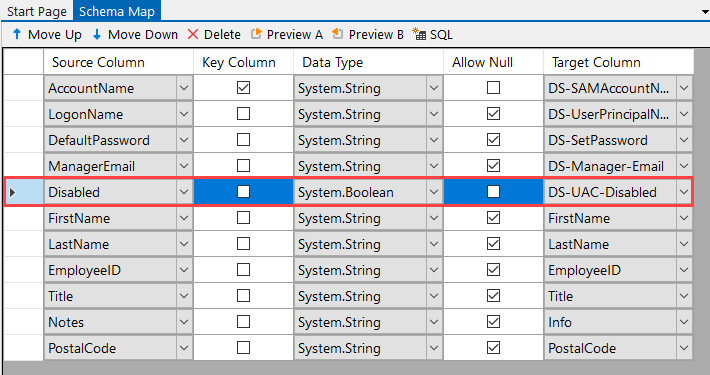
You can also set the user account to be enabled or disabled by returning a boolean value. Return True to disable the account and False to enable the account.
Then map this column to DS-UAC-Disabled.
Add to Groups
To add the users as members in groups you need to have the groups they are to be members of listed in an array separated by a semi colon. Your groups listed must already exist in Active Directory when adding users. E.g. The source data in this example has a value of Group A;Group B;Group C for the groups column.
If your groups do not already exist checkout our groups documentation which covers how to create groups and manager the assigned users.
If your group does not exist in Active Directory then Data Sync will throw an error when you try to synchronise.
To add the users to these groups, map your source Group column to the target column DS-User-MemberOf and Data Sync will handle the rest for you at the point on synchronisation.
At the end of this your schema map should look something like the following image.
Preview and Sync the Results
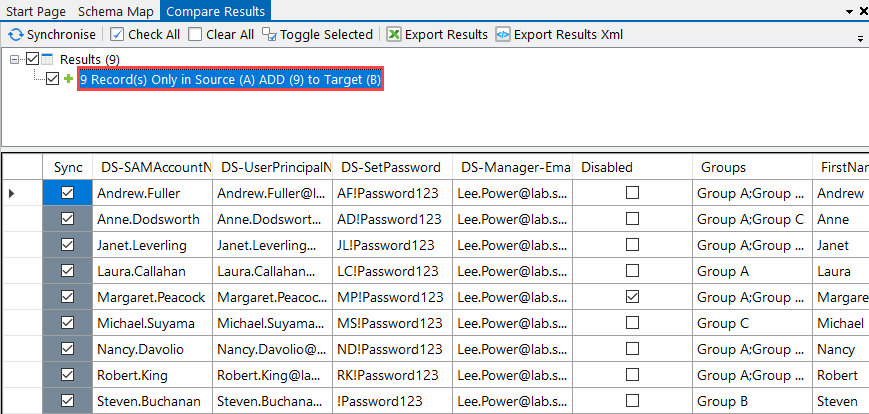
To add the data to your Active Directory you need to click the Compare A > B button. This will enable you to preview the additions or changes being made to your Active Directory.
If it shows delete actions do not panic, these are disabled by default. If you want to enable deletes you will need to set EnableDelete to True on the target.
In this example we have 9 users to add, clicking onto the Add line will show you the data that is to be added to Active Directory.
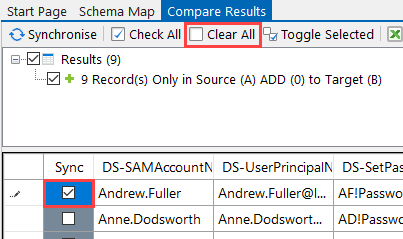
If you want to run a test on one account rather than the whole dataset then deselect the check-boxes using the clear all button and then check the check-box against the record you want to add.
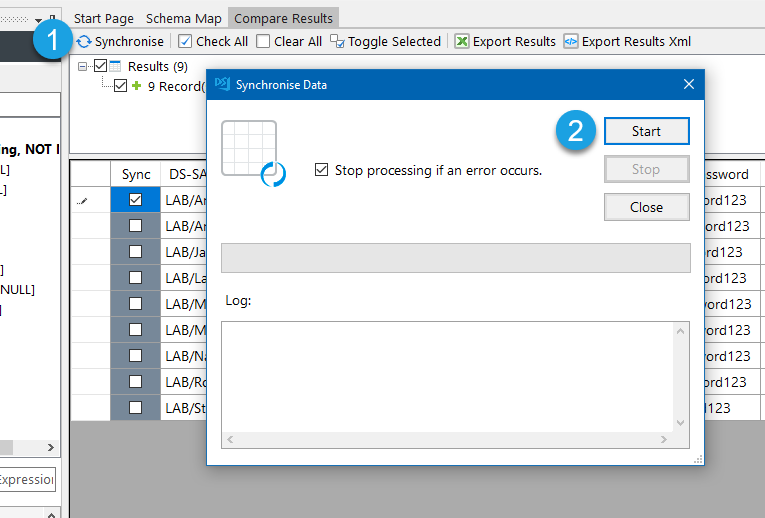
Now click the Synchronise button and then start to begin the sync to add your user accounts to Active Directory.
To check the data has been synchronised successfully you can either browse your AD for a user account or you can click onto the Preview Datasource in the target window.
You should now have all your users added to Active Directory with their managers assigned, them being members of the groups they need to be in, and have a password set so that they can log in.
Automate & Schedule
You may want to automate the creating of user records in active directory so that it runs on a regular basis, to do this you can use either the Run Tool or Ouvvi.
Ouvvi gives more options for scheduling, with both time and event based triggers. So you could configure a trigger to start your project whenever a change is detected in your SQL table or SharePoint List. Note that this requires using a modified date time stamp in your SQL table.
Alternatively you can use the Run Tool to schedule the project to run using Windows Task Scheduler.
Run via the Run Tool
The Run Tool is an additional program that comes linked to Data Sync and enables you to build out your data integration jobs.
You can use this to group Data Sync projects that need to run in order and add additional step types such as adding an status report to email you when the project has run and if there were any failures. Each step is run in the order it appears in the list and you can apply conditional rules so that the next step can run if the previous one succeeded or had data changes for example. To find out more please see our Run Tool Documentation.
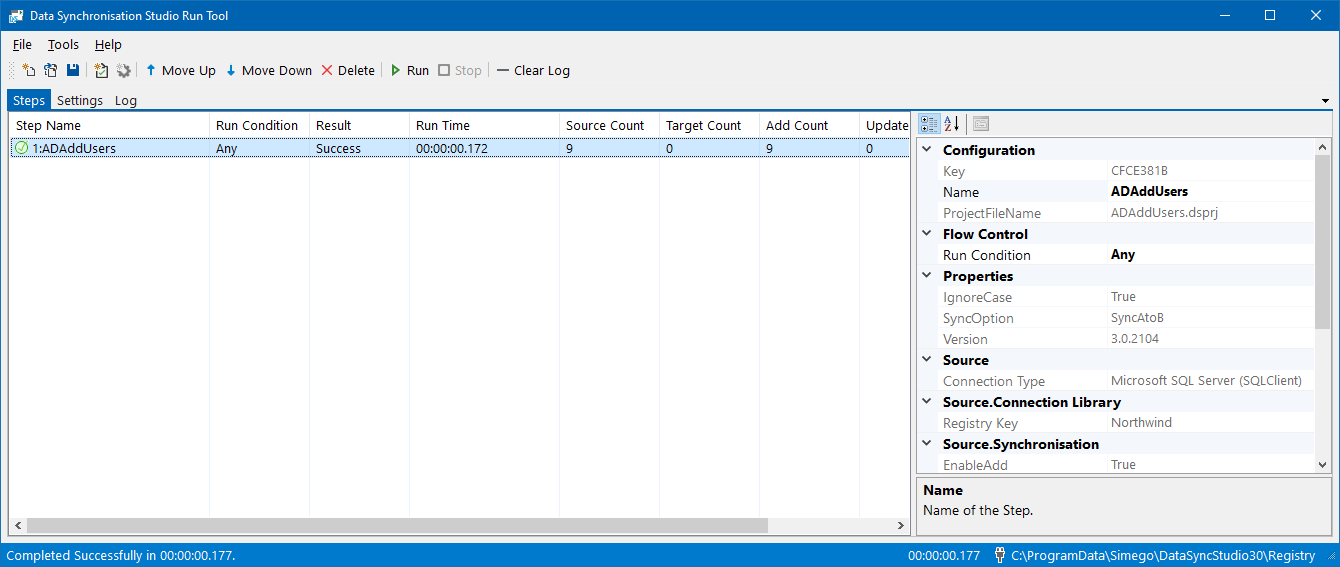
To open your project in the Run Tool, in your Data Sync project go to Tools >Open in Run Tool.

You can then click onto the green Run button to check it runs as expected. If there are data changes you will be provided with a count of how many items were added updated or deleted
Run via the Command Line
Another option is to Run the Run Tool project or single Data Sync project from the command line. To do this pass the path to the project file like this:
Run Tool Project
%DATASYNCINSTALLPATH%\Simego.DataSync.Run.exe -execute "D:\DSProjects\myproject.dsrun"
Data Sync Project
%DATASYNCINSTALLPATH%\Simego.DataSync.Run.exe -execute "D:\DSProjects\myproject.dsprj"
Automate with Windows Task Scheduler
You can then schedule your Run Tool project to run when you need it to using Windows Task Scheduler. For the full details on how to do this see our Task Scheduler Documentation.
Automate with Ouvvi
An alternative option, with more scheduling capabilities is to use Ouvvi Automation Server. Ouvvi enables you to fully schedule and manage all of your Data Integration Projects, from Data Sync projects to SQL Statements to Powershell Scripts.
It provides full logging and documentation capabilities to fully manage your integration operations.
To find out more see our Ouvvi Documentation or send us an email.
We have more ideas on how you can use Data Sync to integrate your business processes with Active Directory in our Solutions Pages.
