Connecting to Salesforce
To open the connection window click on 'Connect Data Source' in either the source or destination. This will display the 'Connect to Datasource' window. Choose 'Salesforce' and then 'Salesforce Object' provider.

Getting API Configuration Details
Consumer Secret and Consumer Key
To get your consumer key and consumer secret you will need to log into salesforce and create a new connected app, depending on which view you are using the following steps will vary.
Lightning View
Go to Setup > Apps > App Manager and choose New Connected App.

Classic View
Go to Setup > Build > Create > Apps and under Connected Apps click the 'New' button.

Now enter in the required settings.

The settings to be completed are:
Connected App Name
Type in a title for the App.
Email Address
Enter an email.
Enable OAuth Settings
Make sure the checkbox is checked.
Callback URL
We set this to be https://www.simego.com.
OAuthScopes Add 'Access and manage your data (api)' to the selected OAuth Scopes.
Then Press save to create the App. This will now display your App settings.
Under API(Enable OAuth Settings) locate Consumer Key and enter this into the Salesforce Connector Window under Consumer Key.
Click to reveal the Consumer Secret and enter this into the Salesforce Connector Window in Data Sync under Consumer Secret.

Security Token
To get your security token you will need to log into Salesforce and reset your security token.
Lightning View
Go to the User Icon and select 'Settings'. Under the 'My Personal Information' menu choose 'Reset My Security Token' and then click the 'Reset Security Token' button.
The system will then send the user an email with the new security token. Copy this into the Salesforce Connector Window in Data Sync under Security Token.

Classic View
Locate the user dropdown in the title bar of the page and select 'My Settings'. Open the Person Menu and choose 'Reset My Security Token'.
Click on the 'Reset Security Token' button and the system will send the user an email with the new secuirty token. Copy this into the Salesforce Connector Window in Data Sync under Security Token.

Save the Connection
Once you have entered your required credentials, save the connection by clicking 'Connect & Update Library Connection'.

Enter in a name for the connection and press 'save'. This will appear in the connection tree under 'Salesforce'.

Connection Library
Once you have saved the connection you can make use of the connection tree, where you can drag and drop the object you wish to connect to into either the source or the target or you can right click and choose either Connect to Source or Connect to Target.
You can also make use of the query function:
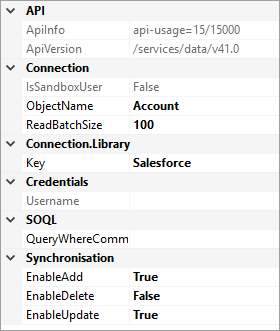
Connection Properties

IsSandboxUser
Connect to the Sandbox Login URL.
ObjectName
The Salesforce object to connect to.
ReadBatchSize
Number of records to return per Salesforce request in Incremental Mode.
QueryWhereCommand
The SOQL WHERE condition to append the SELECT Query.
